Monday, May 1, 2017

Distractions and Unrealistic Scenarios

This article appeared in the June 2017 issue of the American Bonanza Society magazine - www.bonanza.org

A friend of mine was heading home from a business appointment out on the west coast.  He had fueled up for the final leg, picked up his IFR clearance and was eventually cleared to his final altitude of 12,000 feet.  He set the autopilot and settled in for the three-hour flight back to Chicago.

About 100 miles from his destination, the engine stuttered, then quit.  The pilot notified the controller of the problem and requested vectors to the nearest airport, which was right below him.  The airport boasted a 5000ft runway and was clear of obstacles on either side. The weather was clear and it was day time.  He spiraled down and entered a short downwind, a base and then final.  He didn't judge his spacing correctly and landed short of the runway by about 700 feet where the aircraft experienced substantial damage. The pilot sustained serious injuries, but made a full recovery.

By all accounts, the pilot should have had plenty of time to go through the checklist, configure the aircraft and get lined up for the intended landing point – the runway.  Was he a good pilot? Yes.  Did he know his aircraft? Absolutely! Why then, did the outcome of this maneuver that is often practiced in the training environment literally end up short?

When preparing for a training session with an instructor, the trainee typically gets a good night’s sleep and studies as much as possible before the big day.  Many of the training objectives are predictable and as a student, or pilot receiving instruction, you have some inkling that certain things – such as an engine failure - are bound to happen at some point.  This isn’t so in real life as there are many variables creep up on us.  You may be on the third leg of flying, it may be night time, and the typical pressures that gnaw at us may be rearing their ugly head– schedules, passengers, etc.  When something dramatic happens such as an engine failure while we are in the air, there is typically a sense of disbelief, a pause and then the moment where training kicks in.

But, does the training always just magically kick in as I’ve read so many times in stories about close calls?  Depending upon the situation, it might not, or at least it may abbreviate itself and in your haste to get on the ground, you may miss things on the checklist - if you even pulled out the checklist at all.  When a real incident happens, your heart rate starts to elevate, blood pressure goes up and urgency kicks in.  It's easy to make good decisions while you are calm, but how do you know if you will make good decisions when stress is at its highest point?

A good flight instructor will explore the boundaries of a pilot’s limits and attempt to add stress or to get that heart rate going.  How is this done?  That’s where unrealistic training scenarios come into play.

To give an example, I was performing an Instrument Proficiency Check with a student.  He was doing great.  Wait – he was doing fantastic! He was flawless on his approach briefings, radio setup, and standard failures that were presented to him.  So, what did I do?  I knocked his checklist on the floor. As he went to pick it up, I switched the localizer frequency to something else while he wasn’t looking, then covered up his attitude indicator. I also told him that his autopilot was broke, then I told him that he was losing power on his left engine and brought the throttle back to 15 inches.

The pilot did well as he dealt with each problem, but he didn’t think this was a very fair and accurate example of what could happen on a flight.  He told me that in all seriousness, if all of that happened to him on a real flight, he might have just accepted his fate.  He was clearly frustrated - and that was my goal.  We discussed the flight once we were on the ground and I explained that it wasn't was my intention to see if he could handle everything I threw at him, my goals were as follows:

  • Create a distraction
  • Try to increase the heart rate
  • Accelerate the situation
  • Try to frustrate
  • Evaluate the outcome

Is this just another evil flight instructor trick?  Maybe.  Was this a good way to evaluate how a pilot will react when things aren’t going their way in the real world? Absolutely!

When something unexpected happens, frustration will typically manifest itself as the pilot works their way through a problem. Thoughts are bound to go through the pilot’s head they manage disbelief at the situation and try to reconcile how this could have happened.  (Why didn’t my mechanic find this at annual time? Didn’t I check the fuel level before departing?  Why is this happening to me right now?)  This is certainly an aspect of real life that is nearly impossible to replicate in the training environment, but as instructors, we try to do what we can to emulate it the best we can with the tools we have.

The next time an instructor starts to throw unrealistic scenarios at you during a flight review or an instrument proficiency check, know that they are trying to saturate your workload or try to explore the limits of your ability to cope and to observe your performance in a controlled environment.  As with any training event, be sure to debrief with your instructor, especially on items you felt may have been unfair or not necessarily applicable to your type of flying.  They may be evaluating you on something completely different than what you thought, so gaining this valuable feedback is very important.  Conversely, the instructor should know if you are ready to advance beyond aircraft handling and procedures, because if those aren’t solid, there is no point in adding unnecessary frustration.

Every instructor wants to create a positive and valuable experience, so if you are one of those pilots that have owned the same airplane for many years, fly hundreds of hours per year, and are very proficient, a good instructor is going to do a little more than make sure you have procedures down pat by throwing you a curve ball that you didn't expect.

Monday, April 3, 2017

My ATP Check Ride

I wrote the following blog the day after my checkride in 2016.  I am actually publishing it now since I finally found my original post:

On Saturday January 30, 2016, I took my ATP Multi-Engine Check ride in Janesville, Wisconsin with Chris Anderson – Designated Pilot Examiner.  Start time – 9am.

I departed with my mentor and the instructor that had instructed me for just about every one of my ratings - John “Doc” Magon - and a good friend of mine of many years, Ken Cooper from KGYY at 8am for an arrival at 8:50am in Janesville.  Doc was instrumental in giving me the training I needed in order to get this whole thing accomplished, and Ken was unbelievably generous in allowing me to use his Cessna 310 for the training and test.

Other than the directional gyro acting a little goofy, the morning couldn’t have been nicer – it was smooth as silk, and there was nobody in the pattern or on the frequency when we arrived in Janesville. 

Meet Chris Anderson – designated pilot examiner for the FAA.  Truth be told, this is actually the third time we have met, which I will get into shortly.  Preflight was completed and we got into the plane.  Startup sequence went well, and we received our taxi clearance for runway 22.  Upon heading for taxiway D, from the ramp, the tower called and said that we had passed taxiway D and it was behind us.  I stopped the plane and asked point-blank – “did I just fail the check ride?”  Not a good way to set the stage for the rest of the morning.

After being reassured that we were fine and I could proceed, we finally got to Runway 22.  Before takeoff items all checked out and I was given instructions to turn right heading 280 and intercept V97 – Maintain 2700.   I was also instructed to get the IFR hood on and to be on instruments at 100 ft. after takeoff.

Takeoff went fine and I got the hood on at about 100 ft.   At 400 ft, he failed the right engine on me.  I went through the memory checklist and simulated feathering the engine.  Everything successful so far.  The examiner told me to climb to 2700 ft MSL and expect Radar Vectors to the RNAV 22 approach at JVL.  I was about 12 miles southwest of TEGGU, and it took every bit of that distance to get up to 2700ft.  With only about 300 fpm climb, I was sweating it.  I arrived at 2700 ft just as I got my first vector on the final approach course – about 3 miles outside of the Final Approach Fix.  GPS locked and loaded – I almost forgot to switch from VOR/LOC mode.  We had to make one landing with no flaps, so I declared that I wouldn’t use any flaps on this approach especially with the failed engine.  The approach was uneventful, and we taxied back to runway 22 for another take off.  That approach was so intense, I had to ask the tower twice for taxi instructions back to runway 22 (Taxi back via alpha – cross runway 32).

Instructions upon take off were just the same as before – right turn to 280 and intercept V97 – climb to 4500 ft.  We did that without incident and after a few minutes, we started to do the stall exercises.  We did three of them – one straight ahead, one to the right, and one to the left - both at 20 degrees of bank (One with flaps down and gear down).  We then did unusual attitude recoveries – one nose high, and one nose low – Both with no attitude indicator.  Recoveries on all were a success.  I started to feel a lot better about how the check ride was going.  He then said that he would vector me in for the ILS 4 at Janesville.

I received vectors to the northwest of the airport, which took me off guard since the ILS extends to the south west, then I realized what he was doing.  He wanted me to perform the DME Arc to the ILS4.  Oh boy, I haven’t practiced one of those in a couple of years, and I certainly didn’t really know how to work it with the navigation equipment on-board the aircraft (A Garmin GNS480 – no, not a 430… It was a 480), so I set up the GPS with what I thought was correct, and also set up all of the old school equipment (DME and VOR) for a backup.  The GPS worked well until I was about a mile from the ILS intercept, so while I was trying to decipher what was going on, I just started to turn inbound ILS (a little late since I didn’t have my lead radial set up either).  Just as I turned on to the ILS, he failed an engine.  I continued the approach down to about 1400 ft and I had to do a missed.  New instructions were climbing right turn to the JVL VOR.  After trying to climb a couple of hundred feet, I got my engine back.  He wanted full cruise speed to the VOR and wanted me to set up for the VOR approach at Beloit, Wisconsin. 

I had been to Beloit a couple of times before, so from memory, I set up C44 in the GPS and to my dismay an airport in Connecticut came up!  I went back to the approach chart and found out I was dyslexic – it was actually 44C.  Perfect!   I didn’t need the GPS, but I wanted to make sure that I had everything setup on the navigator so that I had the best situational awareness possible.  I got to the VOR, did the outbound leg, turned inbound (Almost missed doing an ATC call on the procedure turn inbound) and did the approach to the missed approach point – performed missed approach – no failures on this approach.  Missed approach instructions were to climb to 3100 ft and expect the ILS 32 at JVL and circle to runway 22.

I was supposed to navigate to TIRRO, but because of other traffic inbound to Janesville, I needed to do a 360 for spacing, and I got a vector on the final approach course.  I needed to report JODER inbound.  Just after passing JODER as we were flying down the glideslope, he failed an engine on me.  I had mentioned that our altitude for circling was 1900.  He told me to look again – Ugh – almost screwed that up – the Altitude to break off was 1260 because I was able to identify the FOGAS intersection.  I still don’t exactly know why approach is set up that way.  I broke out at minimums.  I needed to maintain +50 and -0 on this approach – the tightest tolerances and I was rock solid at 1280 the whole way in. 

We made a circling approach to runway 22 and did our final landing.  His hand was still on the throttle that he failed, so the landing wasn’t the prettiest, but we did it.

Once turning off the runway and doing the after landing checklist, I asked him how he thought it went.  He said “the check ride is not over yet”.  So, not feeling too great, I taxied in to the Janesville Jet Center and shut it down.  He finally said – “good job – you passed.”  We debriefed on a couple of items (mostly him noticing me fumbling on the DME ARC, and also continued follow-up counseling on how crappy light planes perform on only one engine.  Point well taken.

Two hours of flight - Temporary flight certificate issued – Success!

Well, the story did end there, but it actually started way back on December 10th, where I actually met the examiner for the first time.  We did the oral examination, which was actually quite tough.  I thought I was well prepared for the oral, but I really just stumbled through a lot of the scenario questions. 

I had a problem with explaining the fuel system.  I prepared a beautiful explanation of the Beechcraft Baron fuel system and then realized my error.  I re-explained things, describing the Cessna system satisfactorily.  He asked if I need to do a RAIM check before departing if expecting an RNAV approach at the destination.  I said yes - Wrong.  He said if you have WAAS, you don't need to do a RAIM check.  He asked how to perform a RAIM check.  I explained the procedure on the Garmin 480.  He asked if there was any other way.  I said that there was a function on the FAA website (I had barely remembered this).  I guess I remembered correctly.

Since you have WAAS and you don't have to do a RAIM check - What are you required to do before departing IFR and expecting to do an RNAV approach at the destination?  Check for GPS NOTAMs. I honestly couldn't believe I remembered this one.

Do you have to have a current database to do an RNAV approach?  I said no.  He asked me to walk through what you would need to do.  I mentioned that you would need to make sure there were no changes to the approach since the last revision.  I referenced the AIM where it mentions that.  ON A TECHNICALITY - he corrected me and showed me that all Garmin equipment have a statement in the pilots operating manual that says "Approaches may not be flown with an expired database.".  This supersedes what the AIM says - He let me off on that one.

Is the STEC 55X approved for single engine approaches?  I said that we have used it for single engine approaches in practice, and has worked well when trimmed properly.  I said that since we had a failed engine and it was an emergency condition, I would use it if I needed to.  He told me to look this one up and we moved on. (Most GA autopilots have a notation in the operating manual of whether this is approved or not)

We talked about how the STEC is driven (Turn coordinator), and he asked some questions about the gyro for the HSI. I mentioned that it was a remote and located in the nose.  - He asked me to get this clarified.  I did get it clarified and its actually in the tail.

Do we need to do a VOR check? I said no because we have WAAS.  Correct answer, but he asked if we need to do a VOR check if we are planning on doing a VOR approach? The answer was yes.

Total Electrical failure -  Name everything that dies.  This was a hard question to answer only because it was hard to catalog everything in my mind.  I got everything he was looking for but I forgot about the flaps not working.  Ok, now what do you have left / what still works?  Name them -- Including instruments, systems, etc.   UGH!

Total Electrical Failure scenario -- would the boots still work?  I said no because there was an electronic system that controlled how the boots inflate and deflate.

Spin recovery - We discussed the negative effects of spins in a twin - he wanted to know the recovery procedures.  I gave him the typical answer of opposite rudder, power off, nose down to break the stall.  He wanted the proper sequence - which comes first.  I admittedly stumbled through this and said that I would do them all fluidly and at the same time.  He didn’t like that and was looking for the FAA official procedure - He mentioned the mnemonic PARE - Power off, Aileron neutral, Rudder opposite, Elevator down. The second he said PARE, I rattled it off.

Discussion of the effects of Forward and aft CG on aircraft performance, stall speed, Vmc. Performance discussion was OK / Vmc discussion OK / I screwed up on the effects on stall speed and didn't explain it correctly at first, but got through it.

A laborious part of the oral started with the following question:  What is my single engine rate of climb today.  Simple enough, but then he asked if I would be able to meet obstacle clearance requirements for IFR departure.  I was having the brain fart of the century - I had 400 ft per nautical mile in my head.  It’s actually 200ft per NM up to 400 ft.  It took me forever to calculate the 200ft per NM to rate of climb - I couldn't find the conversion chart that I usually used and ended up fumbling with my calculator.  We eventually walked through the scenario, but because I didn't fluidly explain everything and found myself fumbling, I thought I failed right there, but I guess I didn't.

We talked about take-off and landing at Denver and considerations for single engine operations / flight over mountains / flight at 16K ft. and what would happen if I lost an engine / Effects of altitude on Vyse / estimating Vyse at 16,000 ft. - All of that was OK.

Went over all the performance charts in the book and reviewed the Accelerate-go and Accelerate-Stop charts closely.  Did weight change to Weight and balance - added 250 lb person.  No problem.

He asked me to show him that the airplane was airworthy, so we looked through the logs and I walked him through the logbooks.  He asked me to explain Airworthiness Directives, and he picked a random example.  Oddly enough, he picked one that there was no documentation for – an aftermarket cabin heater.  Long story short, the mechanic had the copies of the “accessories” documentation, but the examiner said that we are going to have to get the paperwork figured out before we go on the check ride.  The mechanic was prepared to fax whatever we needed, but I was actually ok with stopping the examination since I was totally played out from the oral exam, which took close to three hours.

The aircraft’s annual inspection was scheduled for the next day, so we flew to Lansing and dropped the airplane off for its annual inspection.  Because of the inspection, and the holidays, I rescheduled the flight portion of the test for January 10.

January 10th brought some poor weather in the morning, but since my check ride was scheduled for 1pm, we had some time to wait for it to move out of the area.  Our noon departure saw low clouds on the south side of Chicago, but it was clear in Wisconsin.  We were able to get on top and make an uneventful flight to Janesville for the flight portion of the test.

Meeting Chris Anderson once again, we got started on the flight briefing.  We were to perform stalls, unusual attitude recoveries, approaches, failed engines, precautionary shutdowns, missed approaches, and a whole variety of emergencies. 

We taxied out to runway 32 for departure.  I was asked to set up to intercept the 360-degree radial from the JVL VOR and fly it inbound – Maintain 3500 ft. 

We started the take-off roll, and the examiner simulated an engine failure with his foot pressing on a rudder pedal.  We recovered with closed throttles immediately and stopped on the runway.  We then took off from that point and I was under the hood for the remainder of the check ride.

I set up the number 1 VOR for JVL and set up the HSI to track the radial inbound.  I initially thought I set the HSI incorrectly, so I spun it around 180 degrees to show 360.  It still showed the same deflection, which confused me, and I ended up putting it back on the original setting of 180.  That should have been a clue.  After some time, I noticed on the moving map that we weren’t really flying toward the VOR.  I had thought I blew past the radial after take-off and started a turn toward 150 degrees to re-intercept.  No needle activity.  After spinning the HSI around to see what radial I was on, I wasn’t getting any indication.  But, I did IDENT the VOR and everything else was fine!  It was the OBS/CDI selector on the GPS – it was in GPS mode and not VOR/LOC.  I think at that point, I failed, but I wasn’t sure.  The examiner told me to go direct to JVL now that I had it figured out and set up for the VOR approach at Beloit.  No sweat.

I was about 12 miles away from the VOR and I was able to set up a course of 270.  Once I got to the VOR, I hit the timer and descended to 2700 ft.  After about a minute, I turned left to 253 for the procedure turn outbound.  One minute later, I turned inbound at 073 to intercept the final approach course - 118, which I set up on the OBS.  Oh no….  I couldn’t believe what I had just done.  When I was approaching the VOR, I SHOULD HAVE turned to intercept the 298 degree radial outbound.  I didn’t even turn and followed some imaginary 270 degree radial outbound.  Recognizing my mistake, I made an aggressive intercept to actually get to the 298 degree radial for my inbound leg.  I did the approach, circle approach and missed.

We then climbed up to do the air work.  Steep turns – Went well.  Stalls – He felt that I lost too much altitude (which he was right) on all of them (four).  Truth be told – I hadn’t practiced them under the hood, so I actually didn’t know what to expect.  I mis-read the Practical Test Standards and didn’t realize that these needed to be done under the hood.  The last time I did stalls under the hood was about 15 years ago – at least!  The unusual attitudes were just OK, and on the nose low recovery I didn’t bring back the power quickly enough.  At this point, I was just done.  We did an engine shutdown (scenario – he says uh oh, it looks like we have a pretty serious oil leak over here, what are you going to do) and that went well, other than the restart took forever.  Pushing the propeller full forward did the trick. The checklist says to just bring it forward of the detent.

At this time, I noticed that we were getting a little low on fuel in the mains, so I switched to the AUX tanks.  We had at least three approaches to do, and I wasn’t sure what the examiner wanted to do, but I was pretty much done – my performance was subpar for my standards and this caused me to want to conclude the checkride.

He told me to set up for the ILS 32 at JVL and failed the engine on procedure turn outbound.  I did the approach with the needles perfect.  A few moments before decision height, he asked if we are allowed to land on the AUX tanks.   I didn’t do the GUMPS check to see that I never switched back to the main tanks.   We landed and he gave me my well-deserved pink slip.  The first one ever.
 
On the debrief he mentioned that he wanted me to make all radio calls as though I was actually with a controller, and he wanted me to make all calls while at non towered airports (Beloit approach – I had the Unicom up, but didn’t make any radio calls.  We didn’t brief on how he wanted to handle that.  My fault).  Additionally, when experiencing an engine failure, you actually go through the motions.  Instead of just touching the Prop lever, he wants you to start to bring it back toward feather (which surprised me). He will grab it before you get to feather.  That way, there is no question on what Prop lever you were “going to” use.  He then sets up zero thrust for you.  He fails the engine by throttle only and makes you do the actual shut down.  He didn’t use mixture or fuel selector to fail an engine.

As I reflected on the check ride, I made a list of things we needed to accomplish on the re-test.  I then looked at my logbook and realized that it had been 62 days since I had flown last!  The holidays took my mind away from the test and the gap in flying made it practically impossible to take one of the most challenging check rides I’ve ever taken.

Chris Anderson was great – he was very helpful, and tried to make the environment as relaxed as possible.  The only thing that was unsettling on the check ride was that he was unusually silent.  I think he wants to give you the opportunity to figure out your mistakes, but it also creates an environment where you doubt yourself.  As an example, he let me go quite a long time on intercepting the 360-degree radial.  I ended up about 15 miles west of the JVL VOR.  He will not answer (won’t even respond to) questions and mainly just acts as a controller on all of the approaches - That’s it – and I totally understand that and that's the way it should be.

It truly was the toughest check ride I’ve ever taken in my life, and I have taken 9 of them.  I didn’t need the rating, and I never even planned on doing it, but I’m glad I did!

Wednesday, February 15, 2017

BPPP: By the Numbers

This article was published in the February 2017 issue of the American Bonanza Society magazine - www.bonanza.org

A large part of what I do as a flight instructor is providing flight reviews.  This gives me an opportunity to fly in many types of aircraft and observe different styles of flying.  A couple of weeks ago I was doing a flight review with a pilot and while performing maneuvers I noticed that he did not use consistent power settings for specific configurations of flight. I asked him if he would slow the airplane down to 120 knots in level flight, which he did, but it took a couple of adjustments of the throttle and trim.  I asked if he knew what power setting would give him 120 knots.  It took a moment, but he eventually gave me the right answer. It was clear that he did not routinely use pitch and power settings to achieve predictable performance of the aircraft. This is not uncommon, but it surprises me that some pilots I fly with haven’t heard of flying their aircraft by the numbers.

The By the Numbers (BTN) strategy is quite simple and has been an effective and safe way to fly aircraft since World War II. Author John Eckalbar did much to popularize this technique among Beech pilots in his book Flying the Beech Bonanza.  The technique is endorsed by the American Bonanza Society and taught in ABS’s BPPP as the preferred way of flying Beechcraft aircraft, making the aircraft much easier to fly and thereby increasing the level of safety. This methodology is particularly beneficial for pilots who exercise their instrument privileges, but also applies to pilots who are using their aircraft for VFR flight.

Instrument flying entails exact and precise control of your aircraft that requires changing of power settings promptly and accurately. There is very little time to try a throttle setting, wait to see how that affects the aircraft, and then readjust the throttle if needed at the same time you are looking through an approach chart and setting up your radios and GPS.  The BTN principle is rooted in the classic formula:  pitch + power = performance. It is nothing more than understanding that there is a power setting and attitude associated with airspeed and vertical speed.

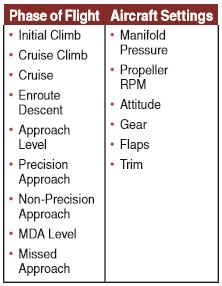
There are nine phases of flight that require a change in aircraft configuration, and six settings a pilot can influence in order to affect indicated airspeed and vertical speed in a predictable way:


These phases along with their aircraft settings will give predictable performance as indicated in the sample PAC (Power, Attitude, Configuration) Chart for an O-470/ IO-470 powered Bonanza (see Figure 1 above). 

Initial Climb 


The goal is to gain as much altitude as possible in the shortest time.  This is done with full throttle (or red line), and maximum RPM.  In most Beechcraft aircraft, you will see about a 10 degree climb pitch with an associated airspeed close to what is noted in the takeoff checklist.  Flaps are normally up, and the gear is raised once a positive rate of climb is established. 

Cruise Climb 


Transition from Initial Climb to Cruise Climb is initiated by simply lowering the nose a few degrees and changing the propeller RPM.  This is done to provide for better cooling of the engine, better forward visibility, and a higher forward speed.  

Cruise 


Cruise configuration is something that should be very familiar to pilots, consisting of power settings derived from preflight motions intended to maximize range and speed.  Based on the numbers calculated for the conditions of the day, the pilot can expect to obtain predicted aircraft performance.  Small adjustments could be made to the cruise configuration to maximize fuel economy, speed or for comfort.  For example, I often fly a G36 Bonanza that doesn’t run as smoothly at 2300RPM as it does at 2350RPM. 

En Route Descent 


As the destination draws closer, you will be required to descend to an altitude for the approach segment of the flight or to pattern altitude.  En route descent numbers will give you good forward speed, a comfortable descent rate, and keep the engine warm.  Throttle control is important as the airspeed in the descent can easily creep into the yellow arc – a hazard if you encounter turbulence. 

Approach Level 


Approach configuration is a level flight attitude that will allow for enough forward speed, but be slow enough to convert to a landing.  This configuration is used when flying the approach and is slow enough to be able to drop the gear at the final approach fix, or to deploy flaps if needed at a phase in the approach.  The Approach Level configuration can also be used in the pattern for VFR pilots. 

Precision Descent 


The only change needed to transition from the approach level configuration is to extend the landing gear.  This will give between 500 and 600 feet per minute descent.  A slight power setting change may be needed to maintain the glide-path, but no trim changes should be necessary. 

Non-Precision Descent 


As with the Precision Descent configuration, the only configuration change required is extending the gear.  This will produce a stabilized descent of between 800 and 1000 feet per minute and should allow for a smooth descent to MDA.  On approaches that require an aggressive descent rate to meet MDA before the missed approach point, a reduction in power of a couple of inches will provide for an accelerated descent rate.

MDA Level 


Upon reaching MDA, a level off will be required to fly to the missed approach point.  This should be done with minimal aircraft re-configuration – by simply adding between six and seven inches of manifold pressure to maintain level flight.  The gear should be left in the down position. 

Missed Approach 


If a missed approach is required, the procedure will be very similar to the cruise climb procedure.  As depicted in the PAC chart, the procedure for a Bonanza with an IO-470 engine would be Full throttle, RPM at 2500, and 5 degrees up pitch.  After seeing a positive rate of climb, retract the flaps and gear. 

Knowing the numbers for your aircraft can you give you predictable performance for various phases of flight that are essential in the instrument environment, but also apply for every day flying such as initial descent, pattern entry, and landing. Besides the Precision and Non-Precision Descent configurations, all the other categories apply to VFR flight.  The Approach Level configuration would be used when flying the traffic pattern and while MDA Level may not be used, a pilot may find this configuration helpful if they find themselves in the pattern with the gear down for some reason.   

The By the Numbers technique reduces the workload for IFR flying and creates a safe and predictable flight environment for VFR flying as well. You can learn more about the technique in the BPPP Systems, Procedures and Techniques Course (BPPP Initial), available free to ABS members under TRAINING at www.bonanza.org.  Schedule some time with a BPPP instructor to review the numbers for your aircraft, and to fly a couple of scenarios to understand how this will help you fly your aircraft more precisely and effectively

Thursday, December 15, 2016

Baron G58 Electrical System

The November issue of the American Bonanza Society Magazine's BPPP column detailed the unique G36 Bonanza electrical system. Although the G58 Baron’s panel looks essentially identical to the G36, the electrical system behind it is substantially different even from that of its single-engine stablemate. This article was published in the December issue of the American Bonanza Society magazine - www.bonanza.org

Multiengine aircraft are typically thought of as being safer than singles because they have an extra engine. But this issue is often debated. Ask a group of pilots whether two engines are better than one and you may hear some use the phrase “the good engine will take you to the scene of the crash,” while others maintain that continual training on engine-out procedures is essential to realizing the safety of engine redundancy.

While a second powerplant is the most obvious advantage of flying a Baron, there is more to redundancy than just the engine. One such example is the electrical system. Some single-engine aircraft are equipped with redundant electrical systems, but as discussed in my November 2016 BPPP column, even an aircraft such as the G36 Bonanza can’t provide total redundancy in the case of a main alternator failure. The availability of a second engine to drive a full-size, second alternator, and room and weight-carrying capability to host a full-size second battery, permits a fully redundant electrical system in the G58 Baron.

G58 Electrical System 


The G58 electrical system consists of two independent systems, each powered by its own 13 amp-hour battery and 100-amp alternator. The alternators are gear driven and attached to each engine ahead of the right, forward cylinder. Each alternator provides power to its respective buss, with power equipment that generally have a “left” or “right” oriented purpose. For example, the left buss normally powers items such as the left engine’s fuel boost pump or the left engine’s starter relay. The HOT BATTERY BUSS is powered by the right electrical system and generally consists of equipment that requires power while the aircraft is shut down, such as the courtesy lights and the clock. There are many systems that don’t have a left or right designation, and there are no cockpit indications that show which piece of equipment is powered by which buss. So it would be wise to study Section 7 of the Pilots Operating Handbook, where you will see charts illustrating equipment and their relationship to each buss.

Busses Tied Relay 


The G58 handles electrical loads and routing of power differently than older Barons when there is a malfunction or alternator failure. In the event of an alternator failure, the operating alternator is able to support the load of the whole electrical system, although this does not happen automatically. If one of the alternators, voltage regulators, or current limiters fail, or any number of abnormal or emergency conditions exists where one of the busses is affected, that alternator must be manually switched to the Buss Tied position to allow power to flow from the other alternator. If you have a situation that requires a shutdown of the left engine, for example, you will need to move the left alternator switch to the Buss Tied position. This enables current to flow from the right alternator to the left buss. The buss tie relay will engage and the left and right busses will connect together so the remaining alternator can power the entire electrical system. A BUSS TIE indicator will illuminate on the G1000 panel indicating this condition.

This process is quite different than the G36 Bonanza’s function. As I wrote in the November issue, it’s normal and expected to see the BUSS TIE annunciator on the ground in a G36, but this would indicate a system failure in a G58. In pre-G58 Barons with alternators, the left and right alternators are tied together to the same buss. If there is an alternator failure in pre-G58 Barons, no action is required by the pilot to maintain electrical continuity. As already noted, in a G58 the pilot must manually tie the busses if one alternator fails. There is one scenario in which the buss tie relay will engage automatically: application of external power to the aircraft while on the ground. Once external power is applied, the buss tie relay connects both left and right systems together so that power can be delivered to both buses.

Failure Scenarios 


The most obvious situation requiring the alternator to be switched to the buss tie position is engine failure. The windmilling propeller will continue to allow the alternator to produce electrical power, but once the engine is secured and the propeller feathered, the alternator should be switched to the buss tie position so power can be made available by the operating alternator. Other situations that may require the busses to be tied are:
  • Precautionary shutdown of the electrical system (erratic voltage or amperage indications from the alternator)
  • A voltage regulator shutdown (overvoltage or undervoltage)
  • The alternator not delivering enough amperage
There may be other scenarios, so an in-depth ground session with your instructor to explore these further would be worthwhile.

Summary 


The G58 Baron can provide total redundancy to the various electrical busses if there is an alternator failure or precautionary shut down. When transitioning to the G58 from an older Baron or a Bonanza, it is imperative for the pilot to have a full understanding of the electrical system. It is also important to cover the differences between the G58 and the other aircraft a pilot is transitioning from. Exploring various failure scenarios with your instructor will help identify appropriate reactions to various situations. Make sure you find an instructor that is well versed in the systems of the G58 Baron. There are many BPPP instructors that are qualified in the G58, and it will be time well spent.

Tuesday, November 15, 2016

Understanding the Bonanza G36 Electrical System

The following article was published in the November 2016 issue of the American Bonanza Society magazine - www.bonanza.org

As an aircraft owner, maintenance issues are bound to arise. When you factor in Murphy’s Law, you will eventually find yourself at an unfamiliar airport talking to a mechanic who may not necessarily be intimately familiar with your aircraft. Because of the popularity of the Bonanza, many mechanics have worked on one at one point, so chances are they can help with many issues that have you stranded away from home.  But what about problems that aren’t so cut and dried?  Understanding the systems on your specific aircraft will help guide the conversation with the mechanic, and possibly save you a lot of headaches.

One of my clients had just taken delivery of a G36 Bonanza and arranged to take it to an avionics shop to have the G1000 panels updated.  Everything seemed normal as we taxied out to the runup area.  Once we started the Before Takeoff checklist, however, we quickly found out that Alternator 1 was not functioning properly. We reluctantly taxied back to the ramp.  It appeared the shop’s technician was somewhat knowledgeable about late model Bonanzas, because he was aware that there were two alternators installed in the aircraft.  However, when discussing the symptoms he made a comment about swapping the alternators to help decide whether it was really the alternator at fault.

It was clear to me that he didn’t have an understanding of the G36 electrical system, which is completely different from any other Bonanza.  I had a brief conversation with him to help shed light on a unique system for a single-engine general aviation aircraft. The G36 does have two alternators. But they are quite different from each other and serve very different functions.   The G36 has two electrical busses, or distribution systems, normally powered by the alternators independently. It also has two batteries, one for each electrical buss.

Alternator 1 and the BUSSES TIED condition 


Alternator 1 is traditional in that it can deliver 100 amps of power to the airplane’s entire electrical system at about 700 or more engine RPM.  While on the ground it does exactly that. This is validated by the Before Taxi checklist as you look for ZERO LOAD on Alternator 2.   The two busses are tied together by a relay. When Alternator 2 is not working you will notice the BUSSES TIED annunciator illuminated on the G1000. This means Alternator 1 is providing power to everything. The checklist reminds you to check for the proper illumination of this annunciator. When the busses are tied together, there are current blocking diodes that isolate Battery 2 from providing power to Buss 1.  A typical current-blocking diode provides a pathway for electrical current to pass only in one direction. Because of the electrical properties of the diode, the electricity that traverses it experiences a drop of approximately two volts.  This is why you see a different voltage range when checking the voltage of Buss 2 in the Before Taxi Checklist than you do in flight.  You can see this isolation demonstrated by turning off Battery 1 and Alternator 1 and observing that Buss 2 still has voltage, but Buss 1 does not. Reversing this scenario with Battery 1 and Alternator 1 switched on, and Battery 2 and Alternator 2 switched off, you will see that Buss 2 still gets voltage because of the buss tie relay.

Alternator 2 


Alternator 2 is a much smaller alternator rated at 20 amps. This factory-installed unit is the same B&C Specialties unit that is sold as an aftermarket backup alternator in pre-2000 Bonanzas (the B&C became standard equipment in A36s that year). Alternator 2 will start to deliver power to Buss 2 when the output of Alternator 2 is above 2.8 amps, which occurs when the engine reaches about 2000 RPM.  Once this happens, the buss tie relay opens, the current blocking diodes are taken out of the circuit, the BUSSES TIED annunciator extinguishes, and the two busses become separate and independent operating electrical systems.  Alternator 1 along with Battery 1 powers Buss 1. Alternator 2 along with Battery 2 powers Buss 2. The voltage on Buss 2 shows a normal operating range since the buss is now getting its power from Alternator 2 without going through the current limiting diodes. This is the normal operating condition. It continues this way until either (1) the engine drops below 1800 RPM; or (2) Alternator 2 output drops below 2 amps.  

Why this unique system? 


Why engineer a system that functions this way?  A look at the equipment that is powered by each buss will help answer this question.  Reviewing the list of equipment on Buss 2, you will find that much of it is essential for safe flight while IFR. If there were ever a problem with Alternator 1 or an issue with any equipment attached to Buss 1, it is reassuring to know that Buss 2 can operate essential equipment completely independently.  This is not to say that a failure of Alternator 1 will be a non-event or that disabling Buss 1 will go without consequence.  If you don’t have power on Buss 1, a number of important things will no longer function, such as the landing gear motor.  It is important to review this list of equipment so that you know what to expect. You might want to tab it in your POH binder (Section III, pages 3-12) so you can find it for a quick review in the event of Alternator 1 failure in flight. It is prudent to also understand how aftermarket additions such as tip tank fuel transfer pumps and various anti-ice systems function in the event of Buss 1 shutdown.  For that you’ll need to check the POH Supplement for the modification or ask the STC holder. As advances in avionics continue, electrical systems evolve and increase in complexity.  It’s up to the pilot to be aware of as many scenarios as possible so that proper troubleshooting can be performed if an issue arises.  The alerts generated by the electrical system and possible equipment failures in the G36 Bonanza could leave an unknowledgeable pilot vulnerable. Having complete knowledge of the electrical system is important in knowing how to manage equipment in normal, abnormal, and emergency conditions, and to understand how these failures will affect the rest of your flight.  This knowledge will also pay dividends when you find yourself at an unfamiliar airport talking with a mechanic about the unique electrical system of the G36.


Thursday, October 6, 2016

Leave your iPad at home

I do a lot of training for pilots that are looking to transition to a Bonanza or Baron.  Often times, the transition is from smaller aircraft that may not be in the high-performance or complex category, but sometimes it will be a lateral move.  For most pilots, the transition is not very complicated - a review of the systems, differences between their old aircraft, and the new one, and flight time can get the pilot up to speed.

It always concerns me when the first 10 minutes of the first flight with a pilot turns into working on mounting the iPad, and routing the wires.  I love the iPad, and I absolutely love ForeFlight and some of the other apps out there for the Android.  Its hard to believe the capability we get as pilots for such a cheap price, but it has its place.


The first flight in the Bonanza will be focused on pre-flight, ground operations, take-off, climb, air-work, cruise considerations, descent, pattern entry, and landings.  Notice, there will be nothing that involves the iPad, and it quite frankly just gets in the way and acts as a distraction.  I'd much rather not have it installed on the yoke for the first flight.  You will need to get acclimated with switch location, instrument indications and gear indicators that may become hidden with most iPad mounts.

The only time an iPad in the cockpit makes sense for initial check out is if there is a Stratus unit available.  Ill have my iPad with me, and will be connecting to your Stratus, or Stratusx/Flightbox, so you still don't need to worry about the iPad until we start doing instrument procedures, or cross countries.

I do understand the excitement - I really do. Owning your first Bonanza is an amazing experience, and I get that you want to get all of the goodies installed in the aircraft.  Ultimately, you will want to get the installation all squared away, but for the first flight, just know - it will be mostly useless.

Wednesday, September 28, 2016

Bonanza G36 Dual Bus System

About a month ago, I had an instance where a student of mine had an alternator failure in his G36 Bonanza at our destination.  We ultimately determined that the number one alternator needed to be repaired or overhauled, but not before a conversation with the mechanic ensued that caused me to raise an eyebrow. The mechanic, who was not totally familiar with the Bonanza, said to me that he wanted to take the number two alternator and swap it with the number one alternator just to see if it was an alternator issue. That was the red flag that caused me to realize that he didn't understand the electrical system and prompted me to think a about how I should explain the electrical system and some of the differences a pilot will need to consider when transitioning into the G36 Bonanza.  An article on this will appear in the November 2016 issue of the American Bonanza Society's magazine.